Configure Magento to use Varnish
To configure Magento to use Varnish:
- Log in to the Magento Admin as an administrator.
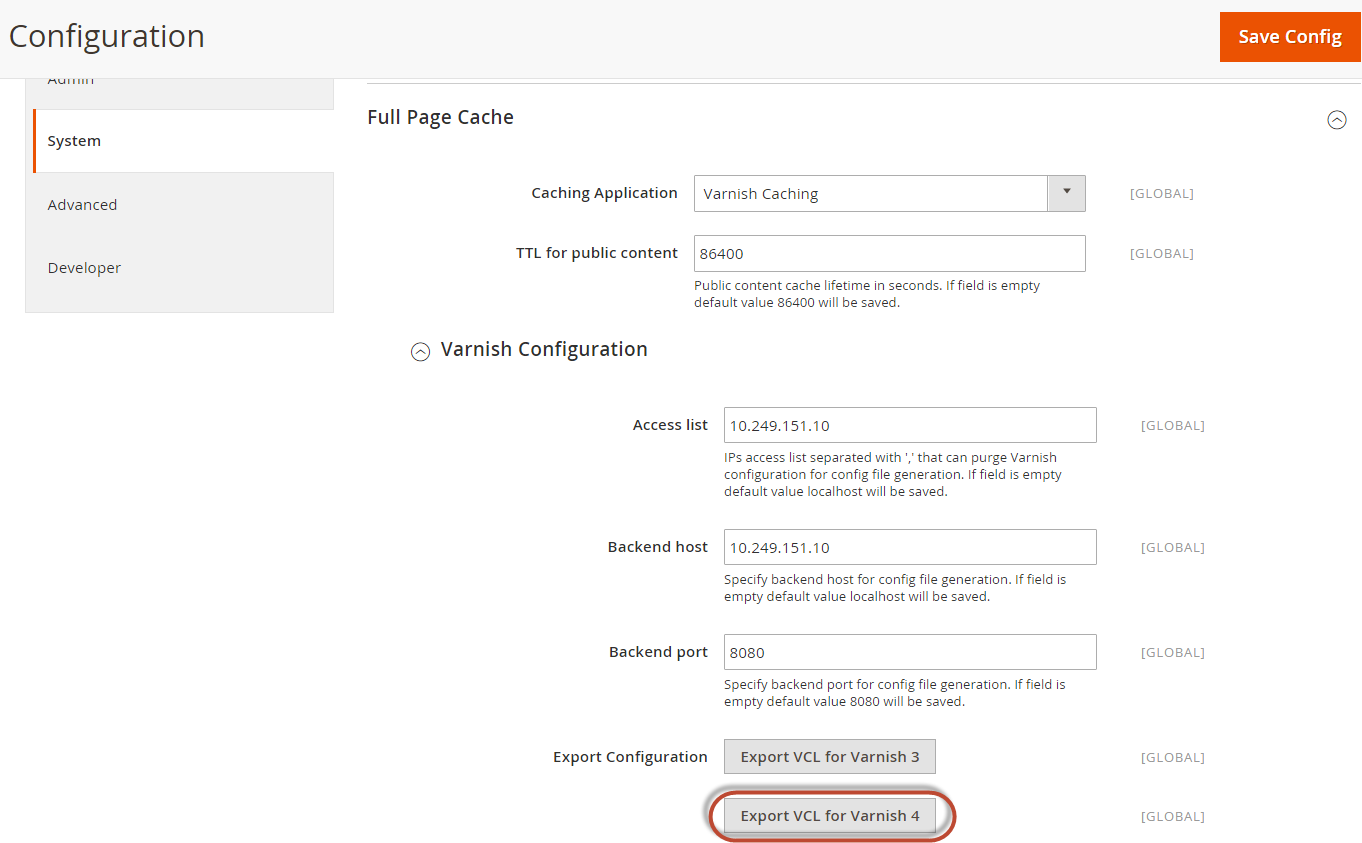
- Click STORES > Configuration > ADVANCED > System > Full Page Cache.
- From the Caching Application list, click Varnish Caching.
- Enter a value in the TTL for public content field.
-
Expand Varnish Configuration and enter the following information:
Field Description Access list Enter the fully qualified host name, IP address, or Classless Inter-Domain Routing (CIDR) notation IP address range for which to invalidate content.
Backend host Enter the fully qualified host name or IP address and listen port of the Varnish backend or origin server; that is, the server providing the content Varnish will accelerate. Typically, this is your web server.
Backend port Origin server's listen port. - Click Save Config.
You can also activate Varnish from the command line–instead of logging in to the Magento Admin–using MySQL statement syntax:
mysql -u root -p -D magento -e "INSERT INTO core_config_data ( scope, scope_id, path, value ) VALUES ( 'default', '0', 'system/full_page_cache/caching_application', '2') ON DUPLICATE KEY UPDATE value = 2;"
Where magento is the name of your database.
Export a Varnish configuration file
This step is optional and should only be necessary if you changed the backend host and/or port number that you specified in the previous section.
To export a Varnish configuration file from the Admin panel:
-
Click one of the export buttons to create a
default.vclyou can use with Varnish.For example, if you have Varnish 4, click Export VCL for Varnish 4
The following figure shows an example.

- Replace your existing
default.vclwith the one you just exported. -
We recommend you open
default.vcland change the value ofacl purgeto the IP address of the Varnish host. (You can specify multiple hosts on separate lines or you can use CIDR notation as well.)For example,
acl purge { "localhost"; } -
Restart Varnish and your web server:
service varnish restart
service httpd restart